WASSCE Physics · Lenses and Image Formation
Converging and diverging lenses: ray diagrams and images
By the WASSCE Tutor team
Updated 10 November 2026 · 7 min read · Prepared against the WASSCE syllabus.
Spectacles, cameras, projectors, microscopes and the lens in your own eye all bend light to form images. A lens is two refracting surfaces working together, and three simple rays tell you where its image will be.
Learning objectives
By the end of this lesson you should be able to:
- distinguish converging (convex) and diverging (concave) lenses
- define the terms principal axis, optical centre, principal focus and focal length
- draw ray diagrams to locate images formed by both kinds of lens
- describe the image for different object positions
Types of lens
| Converging (convex) lens | Diverging (concave) lens |
|---|---|
| thicker in the middle than at the edges | thinner in the middle than at the edges |
| brings parallel rays together at a real focus | spreads parallel rays out, as if from a virtual focus |
| can form real or virtual images | always forms virtual images |
| e.g. magnifying glass, camera lens, the eye lens | e.g. spectacles for short sight, door peephole |
Terms
| Term | Meaning |
|---|---|
| Optical centre (C) | the centre of the lens; rays through it pass straight on |
| Principal axis | the line through the optical centre, perpendicular to the lens |
| Principal focus (F) | for a converging lens, the point where rays parallel to the axis meet after refraction; for a diverging lens, the point from which they appear to diverge |
| Focal length (f) | the distance from the optical centre to the principal focus |
A lens has a principal focus on each side, at equal distances.
Rules for ray diagrams
- A ray parallel to the principal axis is refracted through F (converging) or as if from F on the near side (diverging).
- A ray through the optical centre passes straight through undeviated.
- A ray through F (or heading towards F for a diverging lens) emerges parallel to the axis.
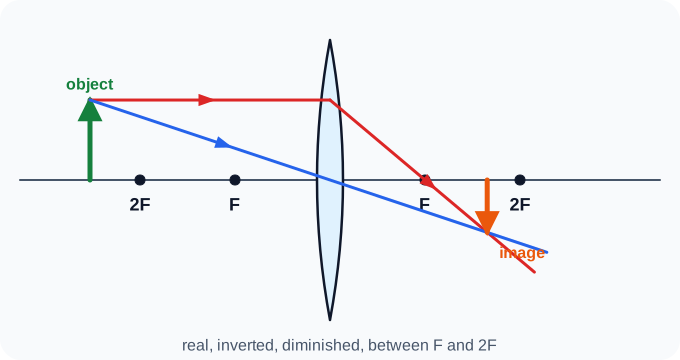
Figure 1. Converging lens, object beyond 2F. WASSCE Tutor diagram.
Images formed by a converging lens
| Object position | Image position | Nature of image | Application |
|---|---|---|---|
| At infinity | at F | real, inverted, point-sized | burning glass; telescope objective |
| Beyond 2F | between F and 2F | real, inverted, diminished | camera, the eye |
| At 2F | at 2F | real, inverted, same size | photocopier |
| Between 2F and F | beyond 2F | real, inverted, magnified | projector |
| At F | at infinity | — (parallel beam) | spotlight |
| Between F and the lens | same side as the object | virtual, upright, magnified | magnifying glass |
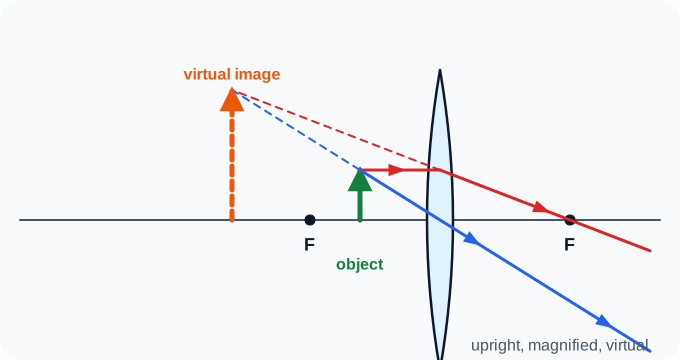
Figure 2. A converging lens as a magnifying glass. WASSCE Tutor diagram.
Images formed by a diverging lens
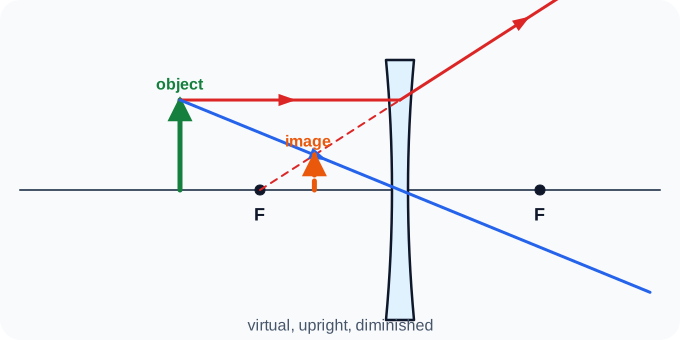
Figure 3. A diverging lens always gives a virtual, upright, diminished image. WASSCE Tutor diagram.
For any object position, the image is virtual, upright, diminished, on the same side as the object, between F and the lens.
Real images are formed where rays actually meet and can be caught on a screen; they are always inverted (for a single lens). Virtual images are where rays only appear to come from; they cannot be caught on a screen and are upright. In ray diagrams, draw the extensions of rays to a virtual image as dashed lines.
Finding the focal length roughly (practical)
Focus the image of a distant object (such as a window or a tree across the compound) sharply on a screen with a converging lens. The distance from the lens to the screen is approximately the focal length, because rays from a distant object are almost parallel.
On a sunny afternoon, a hand lens held above a dry leaf focuses sunlight to a tiny bright spot at its focal point; the leaf can start to smoulder. That is why broken bottles left in dry bush can start fires.
Key points
- Converging lenses are thicker in the middle and have a real focus; diverging lenses are thinner in the middle with a virtual focus.
- Ray rules: parallel → through F; through the centre → straight; through F → parallel.
- Converging lens: object beyond F gives a real, inverted image; inside F gives a virtual, upright, magnified image.
- Diverging lens: always virtual, upright and diminished.
WASSCE examination focus
You will be asked to draw ray diagrams (sometimes to scale on graph paper) to find the position and size of an image, state the nature of the image, and match object positions to instruments (camera, projector, magnifying glass). Use a ruler, arrows on rays, and dashed lines for virtual rays.
Quick check
- Where must an object be placed for a converging lens to act as a magnifying glass?
- What kind of image does a diverging lens always form?
- Which instrument uses an object placed between F and 2F of a converging lens?
Answers: 1. Between the lens and its principal focus. 2. Virtual, upright and diminished. 3. A projector.
Keep going with lenses and image formation
This is one of 2 lessons in Lenses and Image Formation. Start free with the first lesson of every topic, then unlock them all, plus exam-style practice marked instantly and guided learning tools, from 25 NLe.
- Free account, no card needed
- Everything from 25 NLe
- No automatic renewal
More lessons in Lenses and Image Formation
- The lens formula, magnification and power of a lens🔒